Plugin Tutorial
Note, As from 0.7.0 this tutorial is a little out of date, it will be updated shortly.
The intention is to make Gnome15 as easy to extend as possible. There are 2 main options for extending Gnome15. You can either write In Process Plugins or you can write an external application that talks to Gnome15 over DBUS. This tutorial describes the first approach. It walk you through the Clock example to give you a good idea of how all the pieces fit together.
You should have at least reasonable knowledge of Python to create the plugin. Skills in SVG/XML are a help although all screen designing may be done using Inkscape which is pretty easy to pick up the basics.
The full example source is provided here. You can extract the .glade used in this example for the preferences UI, but I would recommend you follow this tutorial in full for all the other files that must be created.
The Plugin
Most of Gnome15 is made up of Plugins. In general, a plugin will retrieve a piece of information from somewhere (such as CPU activity), and render it on to the LCD. The rendering is usually done using SVG Themes. Some plugins might not display anything until some event occurs, or they may be permanent.
How Gnome15 Locates Plugins
Plugins are looked for in a two default locations. Firstly, in the current user's HOME directory, under .config/gnome15/plugins and the now deprecated .gnome15/plugins. Secondly, in a global location - usually /usr/share/gnome15/plugins. To find out what directory global plugins are installed, you may run the following Python script :-
$ python
Python 2.6.6 (r266:84292, Sep 15 2010, 16:22:56)
[GCC 4.4.5] on linux2
Type "help", "copyright", "credits" or "license" for more information.
>>> import gnome15.g15globals as g
>>> print g.plugin_dir
/usr/share/gnome15/plugins
>>>
Now you know the location of the global plugins, you should temporarily move the pre-installed clock plugin out of the way.
sudo mv /usr/share/gnome15/plugins/clock /usr/share/gnome15/old_clock_plugin
You can also specify a list of directories to search for plugins by setting the environment variable G15_PLUGINS before running the various tools. This is useful when working on the Gnome15 source.
G15_PLUGINS=$HOME/my_plugins
The Plugin Layout
A plugin's files should be laid out in a particular way :-
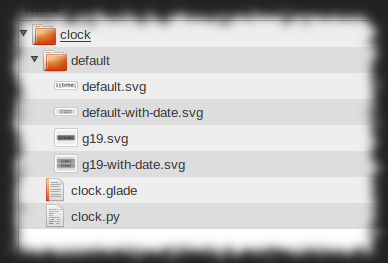
- The root folder name of the plugin must be the same as its Id
- The plugin itself has the same name as the folder it is in suffixed with with .py
- Any ancilliary files a plugin may require should be stored in the root as well. Things such as common images, .glade files for the configuration user interface etc.
- Themes are contained in sub-directories. Every plugin that uses themes must provide a default theme.
- Each theme can contain layouts for multiple models, and variants
- Variants are used when different layouts may be required depending on configuration. In the clock example, this is used to display a different clock if Display Date is not selected.
- All plugins should make best efforts to provide theme layouts for both the G19 and the G15. All G19 theme files should be prefixed with g19-. For the G15 use default- (when the G13 and G15v2 is supported, they have the same screen resolution, so no additional themes will be required).
- Although not used in this example, each theme may provide additional python code for a particular model / variant. This is used when manipulation is not possible (or difficult), just using SVG.
Where To Start
First off, create a directory layout similar to that above. I would recommended leaving the 'default' theme folder for now, and start by writing the plugin implementation. I will also assume you are going to follow the tutorial exactly, to recreate the 'Clock' plugin.
Create a directory to use as a workspace. Give it a name equal to what you will be using for the plugin's Id. Then open up a text editor and create a file called clock.py
mkdir ~/Desktop/clock
cd ~/Desktop/clock
gedit clock.py
Now in your text editor, provide the python header line and the imports for the python classes we will be using :-
#!/usr/bin/env python

import gnome15.g15screen as g15screen
import gnome15.g15theme as g15theme
import gnome15.g15util as g15util
import gnome15.g15driver as g15driver
import gnome15.g15globals as g15globals
import gnome15.g15text as g15text
import datetime
import gtk
import os
import sys
import pango
Plugin Information
All plugins must supply some basic variables. By convention, these should be placed near the top of the python file, just after any imports.
# Plugin details - All of these must be provided
id="clock"
name="Clock"
description="Just displays a simple clock. This is the plugin used in " \
    + " the tutorial at the Gnome15 site."
author="Brett Smith "
copyright="Copyright (C)2010 Brett Smith"
site="http://www.gnome15.org/"
has_preferences=True
unsupported_models = [ g15driver.MODEL_G110, g15driver.MODEL_G11 ]
Note the unsupported_models attribute. In this is present it should contain a list of the models that are NOT supported by this plugin. If this attribute is not provided, the assumption is made that the plugin supports all models. You can also provide a supported_models attribute instead. When provided, only the models listed are supported.
Plugin Preferences
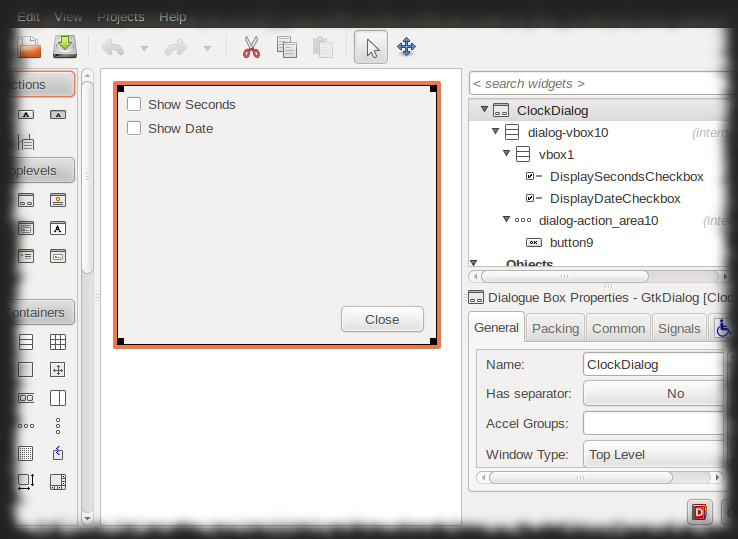
It is quite possible you want to expose some preferences in your plugin. In the Clock example you need two options, "Show Seconds" and "Show Date". You could create your preferences Window completely in Python using PyGTK, but it is recommended you design the window in Glade. Your Glade file should exist at the root of your plugin, by convention named the same as your plugin Id with a .glade suffix.
If the plugin you wish to write has no preferences, set has_preferences to False and you can skip to the Plugin Lifecycle section.
I will not describe how to create this Glade file. For the purposes of this example, you can either try your hand at Glade to produce a dialog that looks like the one in the image on the right, or you can extract clock.glade from the example source archive.
Once you have Glade file, the show_preferences module function must be added. Insert this just after the plugin information described above. You should also ensure has_preferences is set to True in the plugin information.
def show_preferences(parent, gconf_client, gconf_key):
    widget_tree = gtk.Builder()
    widget_tree.add_from_file(os.path.join(os.path.dirname(__file__), "clock.glade"))

    dialog = widget_tree.get_object("ClockDialog")
    dialog.set_transient_for(parent)

    display_seconds = widget_tree.get_object("DisplaySecondsCheckbox")
    display_seconds.set_active(gconf_client.get_bool(gconf_key + "/display_seconds"))
    display_seconds.connect("toggled", changed, gconf_key + "/display_seconds", gconf_client)

    display_date = widget_tree.get_object("DisplayDateCheckbox")
    display_date.set_active(gconf_client.get_bool(gconf_key + "/display_date"))
    display_date.connect("toggled", changed, gconf_key + "/display_date", gconf_client)

    dialog.run()
    dialog.hide()

def changed(widget, key, gconf_client):
    gconf_client.set_bool(key, widget.get_active())
Gnome15 will call the show_preferences function when the user clicks on Preferences for this plugin in the configuration tool.
Note, the show_preferences function may be called either from the g15-applet process, or the separate g15-config command. For this reason, you have no access to the active instance of the plugin. During show_preferences, you should only ever write configuration. The plugin instance itself will have to monitor this configuration and react accordingly (more on this later).
Plugin Lifecycle
You now need to provide a function that will create a plugin instance. This is called once when Gnome15 applet starts. Add the create module function :-
def create(gconf_key, gconf_client, screen):
    return G15Clock(gconf_key, gconf_client, screen)
Now you start implementing the plugin class G15Clock. The activate and deactivate functions must be provided. These will be called either when Gnome15 starts and stops, or when the plugin is enabled or disabled by the user in the configuration tool.
class G15Clock():

    '''
    ******************************************************************
    * Lifecycle functions. You must provide activate and deactivate, *
    * the constructor and destroy function are optional              *
    ******************************************************************
    '''

    def __init__(self, gconf_key, gconf_client, screen):
        self.screen = screen
        self.hidden = False
        self.gconf_client = gconf_client
        self.gconf_key = gconf_key
        self.page = None

    def activate(self):

        '''
        The activate function is invoked when gnome15 starts up, or the plugin is re-enabled
        after it has been disabled
        '''

        self.timer = None
        self._load_configuration()

        '''
        We will be drawing text manually in the thumbnail, so it is recommended you use the
        G15Text class which simplifies drawing and measuring text in an efficient manner
        '''
        self.text = g15text.new_text(self.screen)

        '''
        Most plugins will delegate their drawing to a 'Theme'. A theme usually consists of an SVG file, one
        for each model that is supported, and optionally a fragment of Python for anything that can't
        be done with SVG and the built in theme facilities
        '''
        self._reload_theme()

        '''
        Most plugins will usually want to draw on the screen. To do so, a 'page' is created. We also supply a callback here to
        perform the painting. You can also supply 'on_shown' and 'on_hidden' callbacks here to be notified when your
        page actually gets shown and hidden.

        A thumbnail painter function is also provided. This is used by other plugins want a thumbnail representation
        of the current screen. For example, this could be used in the 'panel', or the 'menu' plugins
        '''
        self.page = g15theme.G15Page("Clock", self.screen,
                                     theme_properties_callback = self._get_properties,
                                     thumbnail_painter = self.paint_thumbnail, panel_painter = self.paint_thumbnail,
                                     theme = self.theme)
        self.page.title = "Simple Clock"

        '''
        Add the page to the screen
        '''
        self.screen.add_page(self.page)

        '''
        Once created, we should always ask for the screen to be drawn (even if another higher
        priority screen is actually active. If the canvas is not displayed immediately,
        the on_shown function will be invoked when it finally is.
        '''
        self.screen.redraw(self.page)

        '''
        As this is a Clock, we want to redraw at fixed intervals. So, schedule another redraw
        if appropriate
        '''
        self._schedule_redraw()

        '''
        We want to be notified when the plugin configuration changed, so watch for gconf events
        '''
        self.notify_handle = self.gconf_client.notify_add(self.gconf_key, self._config_changed)

     def deactivate(self):

        '''
        Stop being notified about configuration changes
        '''
        self.gconf_client.notify_remove(self.notify_handle);

        '''
        Stop updating
        '''
        if self.timer != None:
            self.timer.cancel()
            self.timer = None

        '''
        Deactivation occurs when either the plugin is disabled, or the applet is stopped
        On deactivate, we must remove our canvas.
        '''
        self.screen.del_page(self.page)

    def destroy(self):
        '''
        Invoked when the plugin is disabled or the applet is stopped
        '''
        pass
Handling Configuration Changes
As mentioned earlier in Preferences description, your plugin should handle any appropriate configuration changes (if it has options), and react immediately if possible. You have already requested gconf notify us when changes occur, but you now need to add the callback function that handles this event :-
    def _config_changed(self, client, connection_id, entry, args):

        '''
        Load the gconf configuration
        '''
        self._load_configuration()

        '''
        This is called when the gconf configuration changes. See add_notify and remove_notify in
        the plugin's activate and deactive functions.
        '''

        '''
        Reload the theme as the layout required may have changed (i.e. with the 'show date'
        option has been change)
        '''
        self._reload_theme()
        self.page.set_theme(self.theme)

        '''
        In this case, we temporarily raise the priority of the page. This will force
        the page to be painted (i.e. the paint function invoked). After the specified time,
        the page will revert it's priority. Only one revert timer is active at any one time,
        so it is safe to call this function in quick succession
        '''
        self.screen.set_priority(self.page, g15screen.PRI_HIGH, revert_after = 3.0)

def _load_configuration(self):
        self.display_date = self.gconf_client.get_bool(self.gconf_key + "/display_date")
        self.display_seconds = self.gconf_client.get_bool(self.gconf_key + "/display_seconds")
Drawing The Page
An explanation of Pages is now required. To be able to draw on the LCD, the plugin must reserve a Page for itself. This is done by creating a g15theme.G15Page object, and adding it to the screen instance passed to the plugin creation function. For screens that want to be permanently displayed, you would usually do this in the activate function (see above code). You must also added the page to the screen using screen.add_page(page).
Once you have the page object, you can use this to do things such as removing the page, changing it's priority, cycling to it etc.
Creation of a page also requires that you provide a callback function that will do the actual drawing of the plugin's screen. In this function, you can do one of two things :-
- Perform all of your drawing in Python code. First you provide a function reference when creating the G15Page using the painter argument. Gnome15 uses the Cairo API to do all of its drawing, and the painter function is called with a 'canvas' argument that is an instance of the cairo.Context object (see here for more information). You can do a lot with Cairo directly, and further explanation is way beyond the scope of this tutorial.
- Delegate the drawing to a Theme. This usually means no python is required, just an SVG file. This is the route this example Clock plugin takes. In this case, you will probably want to use the thumnail_properties_callback argument, which should be a function that returns a dict that contains all the properties to pass to the theme (see below for description of theme properties).
You may also want to provide functions for drawing a thumbnail_painter (used in the menu plugin), or a panel_painter which is used by the Panel plugin.
    '''
    Paint the thumbnail. You are given the MAXIMUM amount of space that is allocated for
    the thumbnail, and you must return the amount of space actually take up. Thumbnails
    can be used for example by the panel plugin, or the menu plugin. If you want to
    support monochrome devices such as the G15, you will have to take into account
    the amount of space you have (i.e. 6 pixels high maximum and limited width)
    '''
    def paint_thumbnail(self, canvas, allocated_size, horizontal):
        if self.page and not self.screen.is_visible(self.page):
            properties = self._get_properties()
            # Don't display the date or seconds on mono displays, not enough room as it is
            if self.screen.driver.get_bpp() == 1:
                text = properties["time_nosec"]
                font_size = 8
                factor = 2
                font_name = g15globals.fixed_size_font_name
                x = 1
                gap = 1
            else:
                factor = 1 if horizontal else 2
                font_name = "Sans"
                if self.display_date:
                    text = "%s\n%s" % ( properties["time"],properties["date"] )
                    font_size = allocated_size / 3
                else:
                    text = properties["time"]
                    font_size = allocated_size / 2
                x = 4
                gap = 8

            self.text.set_canvas(canvas)
            self.text.set_attributes(text, align = pango.ALIGN_CENTER, font_desc = font_name, \
                                     font_absolute_size = font_size * pango.SCALE / factor)
            x, y, width, height = self.text.measure()
            if horizontal:
                if self.screen.driver.get_bpp() == 1:
                    y = 0
                else:
                    y = (allocated_size / 2) - height / 2
            else:
                x = (allocated_size / 2) - width / 2
                y = 0
            self.text.draw(x, y)
            if horizontal:
                return width + gap
            else:
                return height + 4

     '''
    Load the theme appropriate for the configuration
    '''
    def _reload_theme(self):
        variant = None
        if self.display_date:
            variant = "with-date"
        self.theme = g15theme.G15Theme(os.path.join(os.path.dirname(__file__), "default"), variant)

     '''
    Get the properties dictionary
    '''
    def _get_properties(self):
        properties = { }

        '''
        Get the details to display and place them as properties which are passed to
        the theme
        '''
        time_format = "%H:%M"
        properties["time_nosec"] = datetime.datetime.now().strftime(time_format)
        if self.display_seconds:
            time_format = "%H:%M:%S"
        properties["time"] = datetime.datetime.now().strftime(time_format)
        if self.display_date:
            properties["date"] = datetime.datetime.now().strftime("%d/%m/%Y")

        return properties
This is the usual pattern for your theme enabled paint function. A dictionary object must be created and populated with the values that you wish to display on the screen in some fashion.
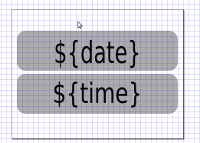
In this case, you create two properties. time contains the current time, and date contains the current date.
The final thing your paint function should do is call the draw function of the theme object, passing it the properties you have built up.
Scheduling A Redraw
The final task in the Python file is write the code to redraw the screen at a fixed interval. As you are writing a clock, this redraw might need to happen once every second (if your 'Show Seconds' option is on), or you may only need to redraw every minute.
A plugin should make best efforts to only redraw when it needs to, particulary if the theme is complex.
def _redraw(self):
        '''
        Invoked by the timer once a second to redraw the screen. If your page is currently activem
        then the paint() functions will now get called. When done, we want to schedule the next
        redraw
        '''
        self.screen.redraw(self.page)
        self._schedule_redraw()

    def _schedule_redraw(self):
        '''
        Determine when to schedule the next redraw for.
        '''
        now = datetime.datetime.now()
        if self.display_seconds:
            next_tick = now + datetime.timedelta(0, 1.0)
            next_tick = datetime.datetime(next_tick.year,next_tick.month,next_tick.day,next_tick.hour, next_tick.minute, int(next_tick.second))
        else:
            next_tick = now + datetime.timedelta(0, 60.0)
            next_tick = datetime.datetime(next_tick.year,next_tick.month,next_tick.day,next_tick.hour, next_tick.minute, 0)
        delay = g15util.total_seconds( next_tick - now )

        '''
        Try not to create threads or timers if possible. Use g15util.schedule() instead
        '''
        self.timer = g15util.schedule("ClockRedraw", delay, self._redraw)
Notice the comment about threads and timers. Using g15util.schedule means all redrawing across all plugins happen on a single thread, so unless your redraw is going to take a long time, you should avoid creating your own thread.
The Theme
Now you are ready to create the SVG file for the theme. While you can of course create this by hand, it is recommended you use an SVG editor such as Inkscape to do this.
First, create the default theme directory in the plugin workspace, cd into it and start Inkscape :-
cd ~/Desktop/clock
mkdir default
cd default
inkscape
Document Sizes And Alignment
You will be creating a total of 4 SVG files, two for the G15 (and other monochrome models when supported), and two for the G19. Each model has two SVG files because there are two Variants (one for when displaying the date, and one for when just the time is displayed). Most plugins do not actually have variants, and the Clock example could in fact be implemented without them, but they are included to demonstrate the feature.
We will start with the default.svg file used for the G15.
Open up the Document Properties dialog (Shift+Ctrl+D) and set a Custom Size of 160px by 43px. These are the exact dimensions of the LCD for the keyboard model.
When drawing shaps and text, you should also try to only use integer numbers for locations and sizes where possible. For example, drawing a box at x=54.2343323, y=12.1213 is NOT recommended. Instead, you should use x=54, y=12. This is not so important for G19 theme files, but failing to observe this in the default themes could mean you get "rough" edges on the G15.
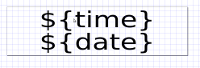
Property Replacement
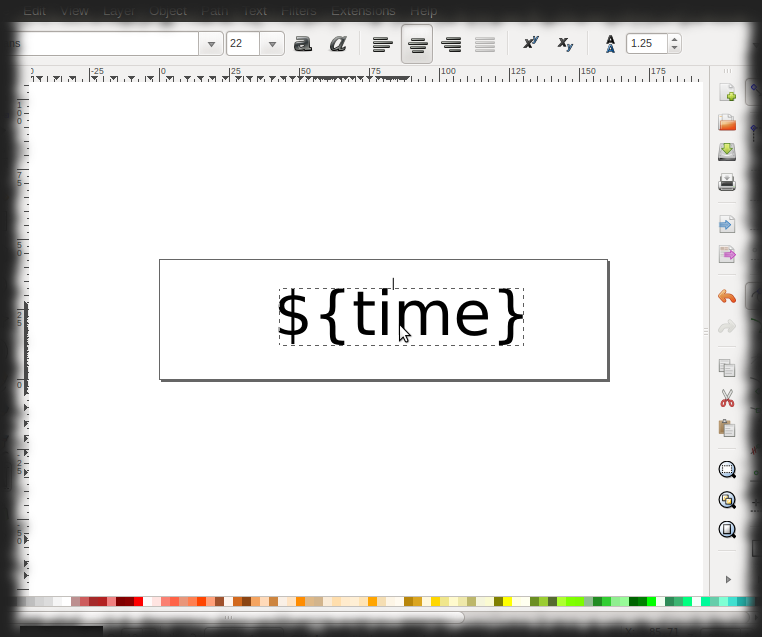
The most used feature of themes is Property Replacement. Gnome15 will replace any occurences of the variable names it finds in the SVG with the value stored in the Properties dictionary created in paint function of the plugin class.
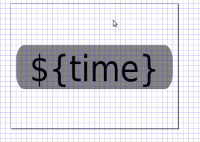
In Inkscape, simply select the Text tool, click where you want to place the text and type the variable name pattern in the format ${NAME}. At this point, you should also set the font size and justification.
For the clock example, you should add a new text field that has a value of ${time} as per the image to the left.
A note about Fonts. While for the G19 you can use any font family, size or style, for the G15 you MUST use fixed size bitmap fonts (the default family is 'Fixed'). The problem is, Inkscape doesn't seem to handle these very well, so you may set the font family to Sans, and Gnome15 will automatically replace the font name when it loads a theme file for the G15..
Default Fill Colour
In order to allow the Background Colour and Foreground Colour controls to work, a theme file should try to avoid using specific colours for the Fill colour. Instead, the element should be set to Inherit.
- Select the required element using the selection tool.
- Press Ctrl+Shift+F. This will display the Fill And Stroke properties dialog.
- Make sure the Fill tab is selected.
- Click on the ? button. This will Unset the paint, and make it use the document's default colour.
Once you have done this, save the SVG file with a name of default.svg.
Create SVG files for the other variants and models
You now need to repeat the above steps for each of the variants and models. When complete you will have 4 files :-
- default.svg - For the G15 and others, no date displayed
- default-with-date.svg - For the G15 and others, date displayed
- g19.svg - For the G19, no date displayed
- g19-with-date.svg - For the G19, date displayed
The SVG files for the G19 must have a different document size, this time 320x240
 |
 |
 |
 |
| default.svg | default-with-date.svg | g19.svg | g19-with-date.svg |
Installing The Plugin
You are now ready to install the plugin and try it out! If you haven't already, move the pre-installed Clock plugin out of the way (see the instructions in the How Gnome15 Locates Plugins section).
For now, install the plugin into the user specific plugins directory. This will be $HOME/.gnome15/plugins. You may have to create this directory.
mkdir -p $HOME/.gnome15/plugins
mv ~/Desktop/clock $HOME/.gnome15/plugins
Now remove the applet from your panel, wait a few seconds for it to completely shutdown, then add it back again. You should now be able to go into Preferences -> Plugins and enabled your new plugin.
Other Theme Features
Here is a quick run-down of other theme features that are not used by the Clock example.
Text Shadows
Due to the nature of the G15's LCD display, if your text overlaps another element, such as an image or other text, the two elements will merge together and become unreadable. To avoid this you can mark text with the shadow style.
- Select the required element using the selection tool.
- Press Ctrl+Shift+Z. This will display the XML Editor properties dialog.
- Add a new attribute with the name class, give it value of shadow and click Set.
Internally, when Gnome15 loads the theme, it will make 8 copies of the element, colour them the same colour as the background, and place them underneath the original element at offsets x-1/y-1, x/y-1, x+1/y-1, x-1/y, x+1/y, x-1/y+1, x/y+1 and x+1/y+1. The end effect is you end up with a 1 pixel white border around all of the text.
Text Boxes
Unfortunately, rsvg, which is used to render the SVG, does not support the tag. This tag is used when you want text to wrap within a defined shape. Within the context of Gnome15, this would be particularly useful for when the size of any replaced text varies wildly (such as Notification messages). However, rsvg just renderes them as big black boxes!
To work around this, the concept of Text Boxes has been introduced. The clock example does not use these, but I will describe them here now.
Basically, you draw two objects in Inkscape. The first being a rectangle that defines the area you want the text to occupy (and give it a class attribute of textbox), the second being the text itself. You then link them together using their Id. The rectangle object should be given an Id equal to the property name of the text it will contain, and the text object should have the same Id, but suffixed with _text.
Look at the source for the Notify SVG files for an example.
Hiding Elements
Another frequently used feature is hiding objects depending on whether a property is set. For example, the Media Player plugin displays a Paused image when the media player is in that state.
- Select the required element using the selection tool.
- Press Ctrl+Shift+Z. This will display the XML Editor properties dialog.
- Add a new attribute with the name title, give it value of del !PROPERTY_NAME or del PROPERTY_NAME and click Set (if the property name is prefixed with an exclamation mark, then it will be removed if it does NOT exist, otherwise it will be removed if it DOES exist).
Progress Bars
The final special theme feature provided is handling of progress bar. Such objects will have their width attribute altered based on the percentage value provided by a property.
- Draw your progress bar somewhere on the canvas as the size it would be if it was "full".
- Select the required element using the selection tool.
- Press Ctrl+Shift+Z. This will display the XML Editor properties dialog.
- Add a new attribute with the name class, give it value of progress_bar.
- Select the id attribute and change its value to be equal to the property name suffixed with _progress.
Advanced Themes - Using Python
If you want to manipulate the theme in a way that is not possible using just standard SVG and the features above, you may provide a python class along with any SVG file. This can contain functions that manipulate the SVG document, or paint directly using Cairo. This feature is currently used by the Calendar plugin and the RSS plugin, so look at the source for those for examples for now.